- Why IRCTC e-Ticket Booking Is the Preferred Travel Option in India
- Requirements Before Booking an IRCTC e-Ticket
- Step-by-Step Process to Book IRCTC Train Tickets Online
- Understanding Ticket Types, Classes, and Quotas
- Cancellation, Refund, and Modification Rules
- Tips to Book & Get Confirmed Tickets Faster
- Conclusion
“Wherever you go becomes a part of you somehow.”
— Anita Desai (Indian novelist, writer, and Educator)
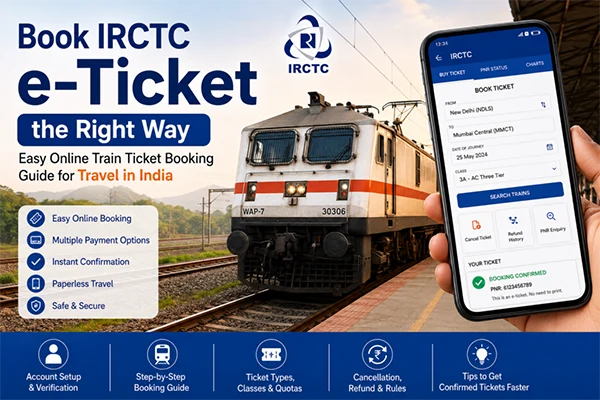
I believe train travel in India is more than transportation; it’s an experience. The sound of the whistle, the crowd, and the passengers’ thrill to explore a new city, it all hold memories and add experience to our lives. Earlier, to get all these, we had to stand in a long queue for hours and required a proper day to get a confirmed ticket. But now with IRCTC ticket booking, travelers can get their tickets in minutes.
So, today I am going to guide you about IRCTC, its process to book tickets, classes, quotas, and cancellations details, along with a few tips to get confirmed tickets faster.
Let’s begin!
Key Takeaways:
- IRCTC is available 24/7; you can book tickets anytime, anywhere.
- You need to register yourself on the IRCTC official portal or mobile app, if you’re booking tickets for first time.
- There are 3 ticket types, 5 train classes and 5 quotas.
- Advanced Reservation Period opens 2 months before travel date.
- Refund of ticket cancellation depends on ticket class, time of cancellation and confirmation status.
Why IRCTC e-Ticket Booking Is the Preferred Travel Option in India
I personally prefer IRCTC for my ticket bookings, and I guess many of you can relate to it, as it has revolutionized train travel in India. People do not need to visit and stand in long queues at railway counters anymore. The convenience of booking tickets anytime, anywhere makes it the first choice of travelers.
Here are some pointers that support the above statement:
- You can book tickets anytime without waiting for the counters to open.
- Saves time by getting a confirmed ticket with a few steps instead of standing for hours in long queues.
- Multiple and easy payment methods are available
- Users can get instant confirmation of their booking via email and SMS.
- It’s easier to check seat availability, fare, and train timings before booking.
- Promotes paperless travel as your e-tickets will be on your mobile phones.
Requirements Before Booking an IRCTC e-Ticket
Before booking IRCTC e-tickets, you need to keep some essentials ready to make the process smooth and quick. It includes your account verification, IDs, and payment modes.
Check them in a brief:
IRCTC Account Setup and Verification
You need to register yourself on the IRCTC website or mobile application to book your tickets:
The registration includes:
- Firstly, open the official site or mobile app of IRCTC and click on “Login/Registration” and select the registration option.
- Enter your details like username, password, and contact details, including email address and mobile number.
- You’ll receive OTP on both email and SMS. Enter them and verify your account easily.
Note: Remember your username and password that you entered, as you’ll need them every time you book tickets.
ID Proof and Payment Methods
On the trains, it is required to provide passengers with evidence of identification. The ticket must have the same name as the ID card given at the ticket checking.
Here is the list of acceptable IDs:
- Aadhaar Card
- PAN Card
- Voter ID
- Passport
- Driving License
These are the following common payment methods:
- UPI Apps
- Debit Cards
- Credit Cards
- Net Banking
- Digital Wallets
Step-by-Step Process to Book IRCTC Train Tickets Online
You don’t need to be stressed out about booking tickets if you’re using IRCTC. It follows a simple process that helps you to book tickets in minutes.
Here is a brief:
- Step 1: Visit the IRCTC website or open the IRCTC mobile application and log in with your registered username and password.
- Step 2: Enter your journey details like departure station, destination station, date of travel and preferred travel class.
- Step 3: Now, it will show you options according to your requested details, and you have to choose your preferred train and class. While selecting one, keep your time and budget in mind.
- Step 4: The system displays seat availability as Available, RAC and Waiting list. If it’s available in your choice of train and class, then go ahead with the same. But, if it’s RAC or waiting, check for the possibility of tickets getting confirmed and make decisions accordingly.
- Step 5: Once you find the best option for you, just hit the book ticket button and enter the passenger’s details, such as name, age, gender, ID information and berth choice carefully.
- Step 6: Choose a payment method like a card or UPI. If you’re choosing a card, then enter card details, or if UPI, then enter your UPI ID, or just simply scan the QR code for fast payment.
- Step 7: After successful payment, the ticket will generate instantly, and you will receive an Email confirmation, SMS confirmation and PNR number, which you can use for PNR status check and get all the details of your bookings.
Understanding Ticket Types, Classes, and Quotas
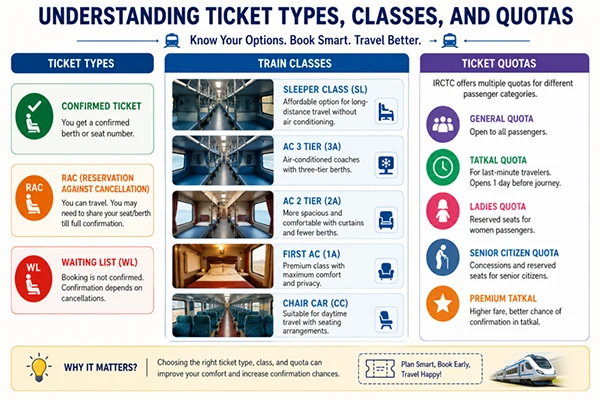
IRCTC gives you the choice to select your preferred seat, class and quota. But, to find your best fit, you need to be aware of these terms. Each train has different ticket types, classes and quotas according to different prices. So, here is an explanation of these terms presented in this image.
Cancellation, Refund, and Modification Rules
There is a famous quote, “Plans are made to be cancelled”. Although it’s just a fun way to tease, there are times when situations are not the same, and you might have to cancel your tickets. But, it doesn’t cost you money because you can get a refund if you proceed with cancellation within a particular time frame.
Therefore, here is a brief table that explains cancellation, refund, and modification rules of IRCTC.
1. Confirmed Tickets (Cancellation Charges)
| Cancellation Time | Cancellation Fee (Per Passenger) | Refund % |
| More than 72 hours before departure | Flat Fee: ₹240 (1AC/EC), ₹200 (2AC/1st), ₹180 (3AC/CC), ₹120 (SL), ₹60 (2S) | ~95% (minus flat fee) |
| Between 72 and 24 hours before departure | 25% of the fare (or flat fee, whichever is higher) | 75% |
| Between 24 and 8 hours before departure | 50% of the fare (or flat fee, whichever is higher) | 50% |
| Less than 8 hours before departure | No Refund | 0% |
2. Waitlisted, RAC, and Tatkal Tickets
| Ticket Status | Condition | Cancellation Fee |
| Waitlisted (Online) | Auto-cancelled after chart preparation | Full Refund (Automatic) |
| Waitlisted/RAC | Cancelled up to 30 mins before departure | ₹60 (Clerkage charge) |
| Waitlisted/RAC | Cancelled less than 30 mins before departure | No Refund |
| Tatkal (Confirmed) | Any time cancellation | No Refund |
| Tatkal (Waitlisted) | Cancelled up to 30 mins before departure | ₹60 (Clerkage charge) |
3. Boarding Point & Modifications
| Feature | New Rule (Post-April 2026) | Important Condition |
| Boarding Point Change | Up to 30 minutes before departure | Only for Confirmed/RAC (not WL) |
| Name Change | At least 24 hours before departure | Must visit PRS Counter with ID proof |
| Train Delayed >3 hrs | Full refund via TDR | File before train departs station |
| Train Cancelled | Full refund | Automatic; no TDR/cancellation needed |
Tips to Book & Get Confirmed Tickets Faster
Sometimes it gets difficult to find confirmed tickets due to server issues, festive season and late bookings. So, here are some of the tips that you can use to book & get confirmed tickets quickly:
- Early Booking: The early reservation period begins 60 days prior to the travel dates, and booking tickets earlier increases the chances of getting a ticket confirmed.
- Find alternative station: If you do not get available seats for your destination or departure station, then try to look for alternative nearby stations.
- Book tickets in Tatkal Quota: there are chances of tickets getting confirmed in Tatkal quota. For this, you ned t login few minutes before booking starts and keep passenger detail ready.
Note: Tatkal Booking Timings are: 10 AM for AC classes11 AM for non-AC classes
Conclusion
The IRCTC e-ticket booking has made train traveling in India faster, easier, and more convenient than ever. From checking train schedules to getting instant confirmations, all of this is now possible online in just minutes. Travelers can enjoy a smooth and hassle-free journey if they know the ticket classes, quotas, and cancellation rules, as well as understand smart booking strategies. If you are traveling for work, on vacation, or visiting relatives, you need to make sure you book your IRCTC e-ticket in the proper way to enjoy a stress-free journey throughout India’s extensive network of railways.
Are e-ticket valid without printing?
Yes, e-tickets are document itself you can use them without printing.
Is it safe to book tickets online?
Yes, it is safe to book tickets online from authorized platform.
Can I link my aadhar to IRCTC?
Yes, you can simply link your Aadhar to IRCTC by following these steps: login IRCTC>Go to my account>tap on “link your aadhar”>enter aadhar details.